Sunday, February 15, 2009

Moved to a New Site


We are happy to announce that Graphic Design Free Resources is moving to a new and better permanent website at:

www.designfreebies.org

If you are subscribing to this blog, I recommend visiting http://www.designfreebies.org/feed/ and start subscribing to our news feed.

We will continue to post more graphic design freebies on the new site.

See you there!

Tuesday, February 10, 2009

Photoshop Tutorial: Cool Fabric Background Using Reflected Gradient Tool

We are happy to announce that Graphic Design Free Resources is moving to a new and better permanent website at:

www.designfreebies.org

See you there!


This is a very easy tutorial that almost any newbie Photoshop user can do. If you want to create a cool fabric background like the image above then follow this simple tutorial.

Let me first tell you something about the Gradient Tool. As it name suggests - it create gradients. But it gives you an unbelievable amount of control of the gradients you create. You can save gradients you create for use later too.


It is worth becoming familiar with the options. From left to right here is a quick overview:

  • Gradient picker - this allows you to be from your gradient library. Click the flyout menu to manage this.
  • Linear gradient - The gradient follows a line
  • Radial gradient - The gradient radiates from a defined point
  • Angle gradient - The gradient is based on a defined angle.
  • Reflected gradient - The gradient is reflected based on your stroke.
  • Diamond gradient - The gradient is a diamond effect. Useful for giving sparkle!
  • Mode - This is the mode of the colour on the screen.
  • Opacity - This defines how see through the gradient is. 100 is not at all and 0 will mean you can't see the gradient.
  • Reverse - flips the gradient colours.
  • Dither - This makes the gradient effect smoother by reducing the colour banding.
  • Transparent - This turns transparency on so if you want parts of your gradient to be transparent you need this.


But for this particular tutorial we will be using two kinds of gradient, the Radial and Reflected gradients. Let's dive in.

Step 1 - Creating the Radial Gradient Background

Create a new document, mine is 400×300px. Grab your Gradient Tool and set it to Radial Gradient. I feel like making it green inspired, so I’m going to use #a9fd06 as my foreground color and #006600 as my background color. Create a gradient near the lower left corner of the document. Your new background will look something like this:

Step 2 - Adding Reflected Gradient on the Background

Create a new layer, and grab the Reflected Gradient Tool. Select a gradient color from the presets (you may customize your own gradient color but for this tutorial I used the copper-chrome type preset). Set the gradient blending mode to Difference. Once this is done, set the blending mode of the reflected gradient layer to Soft Light (you may adjust the opacity till you get an effect that you like). Create an effect like the one shown in the final image above by creating multiple gradients on the same layer (play the video below to see how this whole step is done). I just added the G (Graphire) logo on the lower part of the background just to show everyone that this is an original tutorial for my site, Graphic Design Free Resources.


That's it. A cool gradient background in two easy steps.

You may download the Photoshop PSD file below.
GFDR Reflected Gradient PSD File

Monday, February 09, 2009

Photoshop Tutorial: Layer Masks

We are happy to announce that Graphic Design Free Resources is moving to a new and better permanent website at:

www.designfreebies.org

See you there!


This tutorial is for people who are new with Photoshop or for people who have been using Photoshop but don’t know how to use Layer Masks.

The basics of Layer masks are incredibly simple but very powerful.

This is a quick and simple tutorial that will teach you how to use Layer Mask Basics. And the best way to learn is try to follow this tutorial on your own rather than just reading about it.

First, let me explain what a layer mask is. What happens when someone wears a mask? Silly question, yes? It's obvious that everything behind the mask is not visible and everything else shows. That's basically how layer masks work. Simple? Yes it is, so let's follow a quick tutorial.

The final result will be this image below. It's a picture of my son Jian superimposed in front of Eiffel Tower. After this tutorial, you can now choose any famous landmark, layer mask your photo and show it to your friends. Cool huh?


Step 1: 
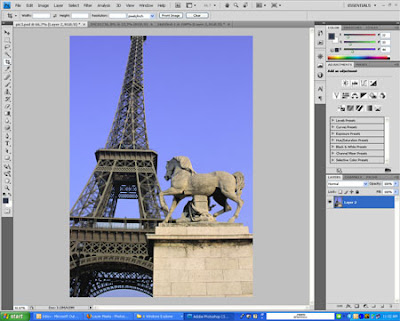
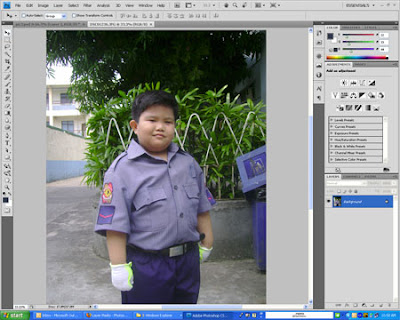
Find two images that you want to combine. Here are the images I used:


Step 2: Open both the images in Photoshop. Click on the boy's image, then choose the Marquee (selection) Tool. Drag it over to the image to select the area you want to paste on the other (Eiffel) image. Copy and paste on the Eiffel image. After pasting it on, you can resize the boy's photo proportionately or you can leave it the way it is. Your choice.


Jian's image selected
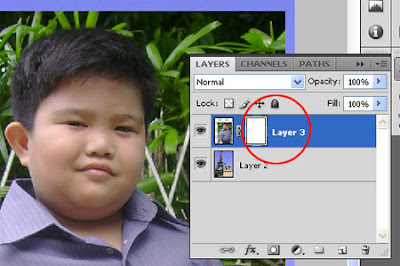
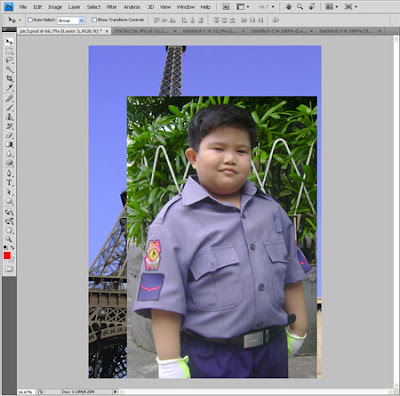

Jian's image pasted

Step 3: Choose the layer with the boy and then click on the Layer Mask button. It’s the rectangle with the circle in it.


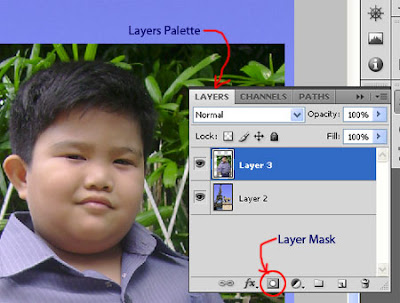
The Layer Mask palette

The layer mask, currently it is set to reveal all of the image, meaning that the mask is off and nothing is hidden.

Now we actually use the mask. While the boy's layer is selected, click on the layer mask button. You’ll also notice that when you click on the layer mask your colors in the color picker turn to black and white. So here it is… the secret of Layer masks: Depending on what the settings are, the color WHITE shows or reveals the image AND the color BLACK hides or masks the image (We’re talking about the image on which the layer mask is applied, not the layer below it). So on to step 4.


Layer Mask added

Step 4: Grab your PAINTBRUSH. Choose BLACK and start wildly painting. Paint over the background of the boy's image. Paint over the background as accurate as you can. Keep on painting until all backgrounds are masked. Now if you make a mistake and hidden part of the boy's image? No problem. Layer masks are not destructive so just change the color to WHITE and paint over the area you want to appear and it’ll magically reappear. You can basically adjust the brush size, or the shade of gray and you get way more control than using destructive methods. If you use an eraser you can’t easily undo something you did 20 steps before etc etc.


Background partially masked

Good thing about layer masks is that you need not worry about being perfect because nothing is being deleted. It’s all there. Just hit the “X” key on your keyboard and you’ll quickly switch between black and white and you can fix your mistakes. Now after you have quickly erased everything that is not needed just zoom away and with a small brush just fix up the edges so they look good.

That's it. In four easy steps, you'll have the final image above.

I hope I was able to show you how layer masks can make your life easier. This is obviously not the only thing you can do with layer masks so keep playing with this and learn more. If you have any questions then leave me comments below and I’ll try my best to get back to you in a timely fashion.

Sunday, February 08, 2009

Free Vector Illustrations: Background Collection No. 2

We are happy to announce that Graphic Design Free Resources is moving to a new and better permanent website at:

www.designfreebies.org

See you there!


Sorting out some vector backgrounds for a magazine I'm currently doing, I came up with these four extra ones. They may not be exactly appropriate for the serious theme of the magazine I'm currently working, but I was able to use some elements from them. The good thing about vector is you can easily pick and use certain elements from other designs and create a totally different one. So once again, time to share four vector backgrounds that you may also find useful for your own custom designs.

1. Blaster Green


2. Earth Flow


3. Kryptolite


4. Mellowmallows

Thursday, February 05, 2009

Free Vector Illustrations: Valentine Artworks

We are happy to announce that Graphic Design Free Resources is moving to a new and better permanent website at:

www.designfreebies.org

See you there!


Valentine's day is about a week away. But let me be the first to greet you, Happy Valentine's Day! And today I'm giving away four special treats to all GDFR readers. Four wonderful and lovely vector artworks originally drawn by an exceptionally creative friend artist ( Sorry Ram if I altered some a bit :p ). You can use them to create special greetings for your loved ones or for your website's love month/valentine theme. All files are in Adobe Illustrator format (CS2 and above).

Valentine Vector Artwork 1


Valentine Vector Artwork 2


Valentine Vector Artwork 3


Valentine Vector Artwork 4

Wednesday, February 04, 2009

Free Vector Illustrations: Cool Glass Icons

We are happy to announce that Graphic Design Free Resources is moving to a new and better permanent website at:

www.designfreebies.org

See you there!


So many vector files I want to share. So here's another one for those looking for cool glass icons. These are 30 glass icons in 6 delicious flavors! Orange, blue, red, black, green, and violet. Files are in pdf format.

Orange Icons


Blue Icons


Red Icons


Black Icons


Green Icons

Violet Icons

Until next time. More freebies to share.

Free Vector Illustrations: Tribal Art Set 1

We are happy to announce that Graphic Design Free Resources is moving to a new and better permanent website at:

www.designfreebies.org

See you there!


Here are some tribla ornamental arts you can use for your designs. Files are in eps and Adobe Illustrator ai (CS2 and above) format.

Tribal Art Set 1


More vector arts to come. Check us out regularly.

Free Vector Illustrations: Background Collection No. 1

We are happy to announce that Graphic Design Free Resources is moving to a new and better permanent website at:

www.designfreebies.org

See you there!


Time to share some vector graphics. I have a huge collection of vector art and graphics. My collection represents some of the finest illustrations by talented vector illustrators and graphic designers. There are no purchase, no subscription fees, no extra costs, just FREE premium quality vector files... Only here at Graphic Design Free Resources.

For starter, I'm sharing with you these awesome background vector illustrations that you can use as is or modify them for your own design using Adobe Illustrator or any other vector editing software you have.

Vector Background #1


Vector Background #2


Vector Background #3


Vector Background #4


Vector Background #5


Vector Background #6


Vector Background #7


Watch out for more vector background collections here at Graphic Design Free Resources.

Tuesday, February 03, 2009

Free 3D Models: 3D Buildings Set 1

We are happy to announce that Graphic Design Free Resources is moving to a new and better permanent website at:

www.designfreebies.org

See you there!


Let me share with you 3d models that I have accumulated doing 3d architectures. These 3D-models are provided in various formats like Cinema4D (version 7 and higher), Lightwave (Version 6 and higher), OBJ, DXF, and 3DS with all texture files included.

These 3D models are compatible with 3ds max, 3DS VIZ 4 and above, ArchiCAD, AutoCAD, Autodesk Image Studio and Studio Tools, Bryce, Carrara 3 - 5, Cinema4D (V7+above), Deep Paint 3D, Electric Image, Houdini, LightWave3D (V6-V9), Maya, MicroStation V8 XM, Poser 4 - 6, Realsoft 3D, RenderWorks, Rhino, Shade (ExpressionTools), SketchUp (@Last Software), SOFTIMAGE|XSI, Strata3D CX, trueSpace (Caligari), VectorWorks, Visual Nature Studio, Vue (d´Esprit) 4 & 5, and World Construction Set.

3D Buildings Set 1 includes 8 detailed 3D-models from a diverse building-type range. All elements of buildings are customizable. Thus, modifying them for variations is easy and quick.

3D Building Model 1
3D Building Model 2


3D Building Model 3
3D Building Model 4


3D Building Model 5
3D Building Model 6


3D Building Model 7
3D Building Model 8


More free 3D models to follow next time. So if you don't want to miss any of these freebies, please subscribe to my RSS here to receive regular updates of Graphic Design Free Resources.

True Type Fonts Freebie Part 1

We are happy to announce that Graphic Design Free Resources is moving to a new and better permanent website at:

www.designfreebies.org

See you there!


We will be featuring free fonts here from time to time. So please visit us regularly for more freebies like these or better yet subscribe to our RSS link if you don't want to miss anything.

1. Agency FB Bold
2. Agency FB Regular


3. Algerian Regular


4. Book Antigua Regular
5. Book Antigua Bold
6. Book Antigua Bold Italic
7. Book Antigua Italic


8. Baskerville Old Face


9. Bauhaus 93 Regular


10. Bell MT Regular 11. Bell MT Bold 12. Bell MT Italic


13. Bernhard MT Condensed

Monday, February 02, 2009

Indesign CS2 Tutorial Part 1 and 2: Introduction, Grid and Guide Management

We are happy to announce that Graphic Design Free Resources is moving to a new and better permanent website at:

www.designfreebies.org

See you there!


InDesign CS2 Beyond the Basics delves into the more advanced features of Adobe InDesign CS2, including tools for working with long documents. This tutorial series covers the program's features for dealing with books, indexes, and tables of contents, and teaches you how to use the automation tools like Scripts and Data Merge. Tips and tricks for working more efficiently in the program by using Snippets, Libraries, Object Styles, and more. This video tutorial is recommended for intermediate-level InDesign CS2 users. Exercise files also accompany the training videos, allowing you to follow along and learn at your own pace.

Part 1 & 2 of tutorial consists of Introduction and Grid & Guide Management.

1. Introduction
2. Grid and Guide Management